Environment specific configuration in zend


In software development life cycle, we generally need different type of environments for different purpose like – “development”, “testing”, “production” etc.

And all these environments has some environment specific configuration. like in development server “display error” will be on and payment mode will be “testmode” But in production server “display error” will be off and payment mode will be “livemode” In production server error logging will be on but in testing server it may not be on. Database connection will be different for each environment. etc etc…

Problem:

Its been a big headache to server management team to modify configuration files each time code update to any server.
Here we have created multiple configuration files for each server and automatically loaded environment wise configuration file using “zend-framework”.

Solution:

Here we will consider 3 environment- “Production”, “QA” and “Development” in order to explain the process.
So we will create 4 ini files:
common_config.ini: to keep common configuration (which don’t change with environments)
app_prod.ini: “Production” server specific configuration
app_QA.ini: “QA” server specific configuration
app_dev.ini: “Development” server specific configuration

common_config.ini:

[Production]
phpSettings.error_log = [path to file] "/application.log"

includePaths.application = APP_PATH
includePaths.library = APP_LIB

bootstrap.path = [path to file] "/Bootstrap.php"
bootstrap.class = "Project_Bootstrap"

autoloadernamespaces.0 = "Project"

resources.frontController.moduleControllerDirectoryName = "controllers"
resources.frontController.moduleDirectory = [path to file] "/modules"

resources.frontController.defaultControllerName = "index"
resources.frontController.defaultAction = "index"
resources.frontController.defaultModule = "account"
[QA : Production]
[Development : Production]

Look at last 2 lines- it is saying QA and Development server both will extend configuration from Production.

app_prod.ini:

[Production]
phpSettings.display_startup_errors = 0
phpSettings.display_errors = 0
phpSettings.log_errors = 1

;payment related credentials
payment.mode = "liveMode"
;db configuration
resources.db.adapter = "Pdo_Mysql"
resources.db.params.host = "localhost"
resources.db.params.username = "user1"
resources.db.params.password = "pass1"
resources.db.params.dbname = "db_prod"

app_QA.ini:

[QA]
phpSettings.display_startup_errors = 1
phpSettings.display_errors = 1
phpSettings.log_errors = 1

;payment related credentials
payment.mode = "testMode"
;db configuration
resources.db.adapter = "Pdo_Mysql"
resources.db.params.host = "localhost"
resources.db.params.username = "user2"
resources.db.params.password = "pass2"
resources.db.params.dbname = "db_qa"

app_dev.ini:

Similar to QA. you now know what will be in this configuration file. 🙂

So we made ready all configuration files. Now need to load proper configuration for environments.
index.php file will contain something like this:


defined('COMMON_CONFIG_INI_PATH') || define('COMMON_CONFIG_INI_PATH',
        [path to file] . '/Config/common_config.ini');

// set APP_INI_PATH according to environment
switch (APP_ENV) {
    case 'Production' :
        defined('APP_INI_PATH') || define('APP_INI_PATH',
            [path to file] . '/Config/app_prod.ini');
        break;
    case 'QA' :
        defined('APP_INI_PATH') || define('APP_INI_PATH',
            [path to file] . '/Config/app_QA.ini');
        break;
    case 'Development' :
        defined('APP_INI_PATH') || define('APP_INI_PATH',
            [path to file] . '/Config/app_dev.ini');
}

defined('APP_LOG_PATH') || define('APP_LOG_PATH',
        realpath(dirname(__FILE__) . '/../logs'));

//Bootstrap the application
require_once('Zend/Application.php');
//load zend_app with config file and run
$application = new Zend_Application(APP_ENV,
        array(
            'config' => array(
                        COMMON_CONFIG_INI_PATH,
                        APP_INI_PATH
                       )
             )
    );
$application->bootstrap()->run();

So here we we have set 2 constant for configuration files according to environment: COMMON_CONFIG_INI_PATH and APP_INI_PATH
and loaded these 2 configuration while bootstrapping.

You are done. Nothing more. Simple, isn’t it? 🙂

Performance Issue in three.js while creating large number of objects and its solution


Few days back I am creating a demo using three.js library(used for rendering 3D objects). I have added three to four geometry on the scene. It was working just fine as well with animation added to it. But when I have increased the number of the geometry rendered on the scene, performance of the demo decreased significantly. 😦

Page loading time also increased. I have done a small mistake in my codding, and many of us can face same issue sometime, so thought of sharing to save your time.. 🙂

For example lets say I need to create five cylinders on the scene, The code I have written:

for ( var i = 1; i < 6; i ++ ) {
var cylinderOne = new THREE.CylinderGeometry(14, 14, 120, 25, 25, false);
var cylinder = new THREE.Mesh(cylinderOne, new THREE.MeshNormalMaterial());
cylinder.position.x = 10*i;
scene.add(cylinder);
}

In the above code it is adding five cylinders to the scene. The issue in the code is in the following line:
var cylinderOne = new THREE.CylinderGeometry(14, 14, 120, 25, 25, false);
This line is creating the cylinder object. In the above code we have added this line inside the for loop. So it is creating as many number of objects as we want to render on the scene which increases the page load time.

We ca decrease the page load time significantly just by adding creating the object outside the loop, which will create only one object for one geometry and we can reuse the same object as many times to as we want to render on the scene as follows :

var cylinderOne = new THREE.CylinderGeometry(14, 14, 120, 25, 25, false);
for ( var i = 1; i < 6; i ++ ) {
var cylinder = new THREE.Mesh(cylinderOne, new THREE.MeshNormalMaterial());
cylinder.position.x = 10*i;
scene.add(cylinder);
}

Thats it, 🙂 it will increase your page load time…

CONSTRUCTOR and DesTruCtoR in php


As a developer “Constructor” is very common to us and we use it very frequently. But do we know what is destructor and when to use it?

Yes the names describe their meanings themselves. Constructor and destructor are 2 methods of a class which are called at the time of object construction and destruction respectively.

Constructor:

How to create:

Generally the way of creating a constructor is creating a method, name of which is same as class name.

For Example:

class foo {
    function foo()
    {
        // PHP 4 style constructor
    }
}

Whereas PHP5 introduce a new magic method “__construct()” to declare a constructor.

The benefit of this method is if sometime we need to change the name of class, we don’t need to change the name of constructor.

For Example:

class newFoo {
    function __construct()
    {
        // PHP 5+ style constructor
    }
}

PHP5 first searches for magic method style constructor. If not present, it searches for a method, same name with class name. So, both style works.

Why to use:

Constructors are useful for initializing an object’s properties, or for performing startup procedures. For example, need to connect to database or set some specific set of configuration or fetch some remote file and cache it for quick usage.
Destructor:

How to create:

PHP 5 introduces a destructor concept similar to OOP concept. Magic method “__destruct()” is used to declare a destructor.

For Example:

class foo {
    function __construct()
    {
        echo ‘Constructor called’. PHP_EOL;
    }
    function __destruct()
    {
        echo ‘Destructor called’;
    }
}
new foo();

This code will display:

Constructor called
Destructor called

REMEMBER that destructor will not be called till the last reference of the object is gone, and this may not take place when you want or expect it.

For Example:

$obj1 = new foo();
$obj2 = $obj1;
unset($obj1);

This one will not call destructor as even if $obj1 is getting unset, another reference is still present.

Why to use:

Its mainly useful for performing cleanup procedures, such as disconnect remote connection, remove temporary files etc.

Hope this will help to effectively use constructor and destructor. 🙂


References:
http://php.net/manual/en/language.oop5.decon.php
http://www-numi.fnal.gov

MyISAM vs InnoDB….??


Storage Engines are the programs that are integrated with a MYSQL database management to manage the data tables. MYSQL supports different storage engines that handles different tables.

Selection of Storage Engine:

Selection of storage engine, depends on users table type and its purpose. Each has their own advantages and disadvantages. Also, possible to select engine at the time of creating tables.
While selecting storage engine, the factors that can affect your selection are:

  • Transaction and concurrency
  • Backups
  • Special features

You should use INNODB for your tables unless you have a compelling need to use a different engine!! (To get High Performance)

By- Peter Zaitsev

Some of important Storage Engines are :
MyISAM, INNODB, MERGE, MEMORY, etc.

The major thing that one should know what are the difference between InnoDB and MyISAM???

MyISAM

(+)

  • Designed with a thinking that database are frequently read not updated.
  • Simple to understand and implement.
  • Has full text searching capability.
  • Good for frequent read operations(when several computations are executing simultaneously)
  • Faster reads and writes for small to medium sized tables.
  • Lock tables while updating.
  • Count(*) queries are fast

(-)

  • Non-transactional. Data loss issues during crashes.
  • Table level locking
  • Insert and update queries are scaleable, concurrency issues

InnoDB

(+)

  • Designed with a thinking that database are frequently updated not read.
  • Transaction-safe
  • Data-integrity is maintained throughout the entire query process.
  • Clustering by primary key for faster lookups and ordering.
  • Transactional, crash-safe, better online backup capability.
  • Allow multiple updates on single table
  • Locks only row, not table.

(-)

  • Slower writes(insert, update queries)
  • Slower BLOB handling
  • Count(*) queries require full table scan.

Simple comparison chart

MyISAM InnoDB
Required full text Search Yes 5.6+
Require Transactions Yes
Frequent select queries Yes
Frequent insert,update,delete Yes
Row Locking (multi processing on single table) Yes
Relational base design Yes


Summary:

Frequent reading, almost no writing => MyISAM
Full text search in MySQL <= 5.5 => MyISAM

In all other circumstances, InnoDB is usually the best way to go and INNODB can now use Sphinx for Full Text Searching.

Reference:

http://www.slideshare.net/gauravpaliwal/mysql-engines
http://en.wikipedia.org/wiki/Comparison_of_MySQL_database_engines

Enjoy Coding! 🙂


How to add billing address, shipping address, last 4 digits of CC to global search for Magento backend


Magento backend is having global search functionality,globalSearch
but we can not search few important fields or parameters using global search. 😦
Recently I came across a situation where I need to add many fields to the global search.
After few hours of research, I got the model classes from where it adds the fields to search.

There are three models for customer, product and order, one each.
Path of the files are: 

app/code/core/Mage/Adminhtml/Model/Search/Catalog.php
app/code/core/Mage/Adminhtml/Model/Search/Customer.php
app/code/core/Mage/Adminhtml/Model/Search/Order.php

According to the requirement we can create our custom module in local and overwrite the file(model) over there. From the local we can modify the content of the file to add billing address, shipping address, last 4 digits of CC to global search.

The path of local file:

app/code/local/MyModule/Adminhtml/Model/Search/Catalog.php
app/code/local/MyModule/Adminhtml/Model/Search/Customer.php
app/code/local/MyModule/Adminhtml/Model/Search/Order.php

Note: “MyModule”  is my custom module name in local code pool.
Here I will explain how we can add different address parameters, order id , last 4 digit of CC, customers name etc. For this we will modify Order.php and Customer.php.

Step:1

On this page : app/code/local/MyModule/Adminhtml/Model/Search/Order.php

 $query = $this->getQuery();
        //TODO: add full name logic
        $collection = Mage::getResourceModel('sales/order_collection')
            ->addAttributeToSelect('*')
            ->addAttributeToSearchFilter(array(
                array('attribute' => 'increment_id',       'like'=>$query.'%'),
                array('attribute' => 'billing_firstname',  'like'=>$query.'%'),
                array('attribute' => 'billing_lastname',   'like'=>$query.'%'),
                array('attribute' => 'billing_telephone',  'like'=>$query.'%'),
                array('attribute' => 'billing_postcode',   'like'=>$query.'%'),

                array('attribute' => 'shipping_firstname', 'like'=>$query.'%'),
                array('attribute' => 'shipping_lastname',  'like'=>$query.'%'),
                array('attribute' => 'shipping_telephone', 'like'=>$query.'%'),
                array('attribute' => 'shipping_postcode',  'like'=>$query.'%'),
            ))
            ->setCurPage($this->getStart())
            ->setPageSize($this->getLimit())
            ->load();

We need to change this snippet of code with following snippet to add order increment_id, billing details, shipping details and last 4 digits of CC.

$query = $this->getQuery();
$salesFlatQuotePayment = (string)Mage::getConfig()->getTablePrefix() . 'sales_flat_quote_payment';
            $collection = Mage::getResourceModel('sales/order_collection')->addAttributeToSelect('*');
            $collection->getSelect()
                       ->joinLeft(array('sales_flat_quote_payment' => $salesFlatQuotePayment),
                       "(sales_flat_quote_payment.quote_id=main_table.quote_id)",array('cc_last4')
            ) ;
            
              $collection= $collection->addAttributeToSearchFilter(array(
                    array('attribute' => 'increment_id',                           'like'=>$query.'%'),
                    array('attribute' => 'entity_id',                              'like'=>$query.'%'),
                    array('attribute' => 'billing_firstname',                      'like'=>$query.'%'),
                    array('attribute' => 'billing_lastname',                       'like'=>$query.'%'),
                    array('attribute' => 'billing_telephone',                      'like'=>$query.'%'),
                    array('attribute' => 'billing_postcode',                       'like'=>$query.'%'),
                    array('attribute' => 'billing_o_a.city',                       'like'=>$query.'%'),
                    array('attribute' => 'billing_o_a.region',                     'like'=>$query.'%'),
                    array('attribute' => 'billing_o_a.street',                     'like'=>$query.'%'),
                    array('attribute' => 'sales_flat_quote_payment.cc_last4',      'like'=>'%'.$query.'%'),

                    array('attribute' => 'shipping_firstname',                     'like'=>$query.'%'),
                    array('attribute' => 'shipping_lastname',                      'like'=>$query.'%'),
                    array('attribute' => 'shipping_telephone',                     'like'=>$query.'%'),
                    array('attribute' => 'shipping_postcode',                      'like'=>$query.'%'),
                    array('attribute' => 'shipping_o_a.city',                      'like'=>$query.'%'),
                    array('attribute' => 'shipping_o_a.region',                    'like'=>$query.'%'),
                    array('attribute' => 'shipping_o_a.street',                    'like'=>$query.'%'),
                ))
                ->setCurPage($this->getStart())
                ->setPageSize($this->getLimit())
                ->load();

By adding this code we will be able to search by order increment_id, billing details, shipping details and last 4 digits of CC.

Step:2

On this page : app/code/local/MyModule/Adminhtml/Model/Search/Customer.php

$collection = Mage::getResourceModel('customer/customer_collection')
            ->addNameToSelect()
            ->joinAttribute('company', 'customer_address/company', 'default_billing', null, 'left')
            ->addAttributeToFilter(array(
                array('attribute'=>'firstname', 'like' => $this->getQuery().'%'),
                array('attribute'=>'lastname', 'like'  => $this->getQuery().'%'),
                array('attribute'=>'company', 'like'   => $this->getQuery().'%'),
            ))
            ->setPage(1, 10)
            ->load();

We need to change this snippet of code with following snippet to add default billing address, customer’s  city, region and street.

$collection = Mage::getResourceModel('customer/customer_collection')
                ->addNameToSelect()
                ->joinAttribute('company', 'customer_address/company', 'default_billing', null, 'left')
                ->joinAttribute('city', 'customer_address/city', 'default_billing', null, 'left')
                ->joinAttribute('region', 'customer_address/region', 'default_billing', null, 'left')
                ->joinAttribute('street', 'customer_address/street', 'default_billing', null, 'left')

                ->addAttributeToFilter(array(
                    array('attribute'=>'firstname', 'like' => $query.'%'),
                    array('attribute'=>'lastname', 'like'  => $query.'%'),
                    array('attribute'=>'company', 'like'   => $query.'%'),
                    array('attribute'=>'city', 'like'      => $query.'%'),
                    array('attribute'=>'region', 'like'    => $query.'%'),
                    array('attribute'=>'street', 'like'    => $query.'%'),
                ))
                ->setPage(1, 10)
                ->load();

Now we can upload these two files and flush the cache. Then from backend search for any field from Global Search… 🙂


Common Session Attacks (Session Fixation and Session Hijacking)


We developers use session protected functionality to restrict unwanted access, to provide security.  Do we know there are 2 very popular session attacks?

In the first type of attack, attacker can hijack any user’s session and use that same session to grab illegal privilege. This is called “session hijacking”.

In the second type of attack, attacker tricks to use her own specified session to victim which in turn disclose victims valuable details. In this way attacker fixes victim’s session, hence called “session fixation”.

In the both ways the main target is to use the same session which victim is using.

Procedure of Attack:

Except the initial step both type are same.

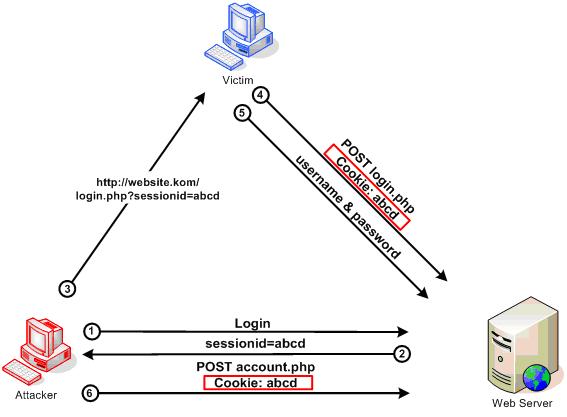
Session Fixation: This process starts before victim logs in. First atacker logs into the system and receive a valid session identifier (say sessionid = abcd). now attacker sets the victim’s session even bofore victim logs in.

Fixation

Following are 2 basic way to trick user-

http://anywebsite.com/<script>document.cookie=”sessionid=abcd”;</script>
http://anywebsite.com/<meta http-equiv=Set-Cookie content=”sessionid=abcd”>

Now if victim clicks on this type of link their session set to “abcd”. Now when victim logs in, same session id gets associated to his session.

Session Hijacking: In this process attacker try to grab a session which victim is using.

Following are few basic way to attack-

using cross site scripting –

<SCRIPT>alert(document.cookie);</SCRIPT>

Man-in-the-middle attack
Man-in-the-browser attack

Now the attacker impersonate as victim as she is using same session as victims session, and do whatever she wants.

Prevention:

Session Fixation:

-> Since Session Fixation starts before login, we can create a new session whenever an user logs in, hence preventing using of an existing session.
-> Use session_regenerate_id();

Session Hijacking:

Session hijacking cannot be directly prevented, however we can put steps in to make it very difficult and harder to use. Remember how difficult we can make it, attacker will leave and look for a softer target

-> Use a strong session hash identifier: session.hash_function in php.ini. If PHP < 5.3, set it to “session.hash_function = 1” for SHA1.
If PHP >= 5.3, set it to session.

hash_function = sha256

or

session.hash_function = sha512

-> “session.hash_bits_per_character = 5” in php.ini. When the attacker tries to guess the session identifier the ID will be shorter, but uses more characters.
-> Change the default session name from PHPSESSID to something else.
-> Save $_SERVER[‘HTTP_USER_AGENT’] in session and check in every request for user agent.

Defend attackers 🙂

References:
http://shiflett.org/articles/session-hijacking
https://www.owasp.org/index.php/Session_fixation
http://stackoverflow.com/questions/5081025/php-session-fixation-hijacking

Grocery CRUD : CodeIgniter


Grocery Crud is a CodeIgniter CRUD. It is fully tested in codeigniter 2.0 and in 1.7.x. You don’t need so much line of codes, models , views, libraries to make a CRUD works. Just few lines need to write and a stable CRUD is ready.

Grocery CRUD is a codeigniter CRUD library that makes a php developer’s life easier.
Simple and many Features!

Even for complex CRUDs you can use it by adding callbacks. You can choose the CRUD template that you want to use by changing only the theme. You are able to build the grid and the forms easily and automatically by using the power of jquery.

The different themes currently available  are: List View

  • Datatables
  • FlexGrid
  • Twitter-Bootstrap

The good part is that you don’t even have to change the CSS to make it more user friendly. Grocery CRUD is ready for the production mode with all the required security and views.
Grocery CRUD is an automatic CRUD generator and it can cover almost all your needs for a CRUD system (simple or complex one) as it has many features and still keep going.

Features

  • Change themes easily.
  • Grid listing with paging, sorting, searching by field and search for all with ajax (with all themes)
  • Automatic creation of inputs by field type
    (Field types that auto-generate different inputs are: integer, string, text, date, datetime, set, enum, true_false(0 or 1), hidden, password and readonly)
  • Database relation 1-1 , 1-n and n-n , automatically with just one line of code
  • Validation form with client side validation and server side validation
  • Add your own validation rules
  • Have Flexibility to choose columns and fields that you want to add to your table
  • CALLBACKS almost everywhere to do your own customization
  • Can add your own model or by extending the basic model
  • Supports all modern browsers, such as: Mozilla Firefox, Google Chrome,Opera, Safari, Internet Explorer 9 or later and also supports for all the modern OS systems such as Windows, Linux, MACOS
  • MOBILE compatible, works fine with the default browsers of Android , Windows and iPhone.

Installation

The installation is really easy. Need to download grocery crud zip from here http://www.grocerycrud.com/downloads

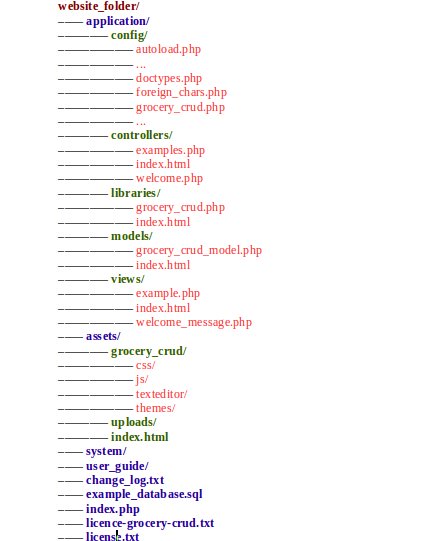
After this, You need to just copy all the files to your project and you are ready to use grocery CRUD. By the end of the installation, your file structure should look similar to this.
driectory display

After this, you are ready to use.

Enjoy Coding! 🙂

Reference: http://www.grocerycrud.com/

FULL-TEXT search using MYSQL


MySQL provides a wonderful way (Full-text Search) of implementing a little search engine in your website. All you have to do is to have MySQL 4.x and above.

Why FULLTEXT ??

MySQL allow text searching by using the LIKE and regular expression. But, these methods have some limitations like:

  • Performance: MySQL need to scan whole table to find the exact text based on pattern in the LIKE  or pattern in the regular expressions.
  • Flexible search: It is difficult to have flexible search query e.g., to find product whose description contains car but not classic.
  • Relevance ranking: No way to specify which row in the result set that is more relevant

Features of MySQL full-text search:

  • Native SQL-like interface: you use SQL-like statement to use the full-text search.
  • Searches are not case sensitive
  • Fully dynamic index: MySQL automatically index the text column whenever the data changes. You don’t need to run the index periodically.
  • It does not take much memory to store the index.
  • It is fast to search based on complex search query.

SearchGet Started

Before we start, it’s important to know about these keywords:

MATCH

The MATCH function is used to specify the column names that identify your FULLTEXT collection. The column list inside the MATCH function must exactly match that of the FULLTEXT index definition, unless your search in boolean mode (see below).

AGAINST

The AGAINST function is where your full text search query goes. Besides the default natural language search mode, you can perform boolean mode searches, and use query expansion.

Lets start with some sample table and query:

CREATE TABLE articles (
    id INT UNSIGNED AUTO_INCREMENT NOT NULL PRIMARY KEY,
    title VARCHAR(200),
    body TEXT,
    FULLTEXT (title,body)
);
// Insert some data into table

INSERT INTO articles (title,body) VALUES
('MySQL Tutorial','DBMS stands for DataBase ...'),
('How To Use MySQL Well','After you went through a ...'),
('Optimizing MySQL','In this tutorial we will show ...'),
('1001 MySQL Tricks','1. Never run mysqld as root. 2. ...'),
('MySQL vs. YourSQL','In the following database comparison ...'),
('MySQL Security','When configured properly, MySQL ...');

Here two types of search are possible:

  • Natural Language Full-Text Searches
  • Boolean Full-Text Searches

Natural Language Full-Text Searches

SELECT * FROM articles
    WHERE MATCH (title,body) AGAINST ('database');

This query will fetch all the records which has database keyword.

Boolean Full-Text Searches

SELECT * FROM articles WHERE MATCH (title,body)
     AGAINST ('+MySQL -YourSQL' IN BOOLEAN MODE);

In above query you see that I have added IN BOOLEAN MODE in against(). This query will fetch all the records which has MySQL keyword but not YourSQL keyword. (+ and – that we have specified before the keywords)

+ stands for AND
- stands for NOT
[no operator] implies OR

Remember:

Not all storage engines support full-text searching. In MySQL, only MyISAM and InnoDB storage engines support full-text search. The MATCH() column list must match exactly the column list in some FULLTEXT index definition for the table, unless this MATCH() is IN BOOLEAN MODE. Boolean-mode searches can be done on non-indexed columns, although they are likely to be slow.

Enjoy Coding! 🙂

Reference: http://viralpatel.net/blogs/full-text-search-using-mysql-full-text-search-capabilities/